HTML5 Drag&Drop + 純AJAX檔案上傳
Fri, 08 Oct 2010 14:50:16 +0800(有一些基本說明在前一篇文章:「一個簡單的HTML5 Drag & Drop試作」裡面提過了,這裡就不在重複了。)
除了在頁面之內使用拖拉,HTML5更強的地方,在與其他應用軟體間也能拖來拉去!這主要是靠DataTransfer.files屬性達成的。DataTransfer.files其實是一個FileList物件,而FileList則是包含了File物件的List...(廢話),這幾個東西,其實不是定義在HTML5裡面,而屬於File API。
當從其他應用軟體或作業系統拖曳檔案進來時,dataTransfer.types裡面會有一個值'Files',這時相對地在dataTransfer.files裡面就會有File物件,裡面有拖曳的檔案資料。要讀取File物件,則需透過FileReader物件,這些都是屬於File API裡面定義的物件。先來看看這些物件的定義及特性:
FileList是容納File物件的Sequence,只要利用跟Array一樣的方式([index])來操作就可以,不過他並沒有Array物件所擁有的方法及特性,所以不能搞混了:
typedef sequence<File> FileList;
File物件繼承自Blob物件:
  interface Blob {

    readonly attribute unsigned long long size;

    //slice Blob into byte-ranged chunks

    Blob slice(in long long start,
               in long long length); // raises DOMException

  };
File物件自己的定義:
  interface File : Blob {
    readonly attribute DOMString name;
    readonly attribute DOMString type;
    readonly attribute DOMString urn;
  };
透過File.size可以知道這個檔案長度是多少bytes,透過File.name可以取得檔名,透過File.type可以知道檔案的MIME type。File.urn理論上可以用來取得檔案的URN,不過我還不知道要怎麼使用比較好,先跳過他。要存取檔案的話,還需要透過FileReader物件:
[Constructor]
interface FileReader {

  // async read methods
  void readAsBinaryString(in Blob fileBlob);
  void readAsText(in Blob fileBlob, [Optional] in DOMString encoding);
  void readAsDataURL(in File file);

  void abort();

  // states
  const unsigned short EMPTY = 0;
  const unsigned short LOADING = 1;
  const unsigned short DONE = 2;

  readonly attribute unsigned short readyState;

  // file data
  readonly attribute DOMString result;

  readonly attribute FileError error;

  // event handler attributes
  attribute Function onloadstart;
  attribute Function onprogress;
  attribute Function onload;
  attribute Function onabort;
  attribute Function onerror;
  attribute Function onloadend;

};
FileReader implements EventTarget;
FileReader繼承了EventTarget,這是DOM3 Event裡面定義的介面,有了他,才能提供addEventListener。FileReader提供了三個讀取資料的函數,readAsBinaryString可以將資料讀取為以byte組成的字串,readAsText可以依照提供的format資訊來將資料讀取為Text,readAsDataURL則可以將資料讀取為DataURL的格式。當在瀏覽器中使用時,這些操作方法都是非同步的,我們需要透過onprogress事件在他每讀取一段資料時透過FileReader.result來取得讀取的資料;或是透過onload事件在所有資料讀取完畢後,透過FileReader.result取得讀取的資料。
如果是圖片檔,透過DataURL,把DataURL指定為img的src屬性,就可以做出讀取後立刻預覽的效果。除了透過拖曳來取得檔案資料,其實在HTML5中,input type=file也有files屬性,可以透過他來做上傳檔案預覽,不過這不是這個測試的重點。接下來看一下測試程式,這部份包含一個php程式,用來把上傳的base64編碼的檔案解碼。至於上傳檔案為什麼是base64編碼...因為XMLHttpRequest的send(),會把資料轉成utf8...另外兩部份是網頁以及負責用multipart/form-data格式上傳的Javascript。
先來看網頁:
<html>
<head>
<meta http-equiv="Content-Type" content="text/html; charset=utf-8">
<style>
  span#panel {
    display: inline-block;
    background: #336699;
    width: 140px;
    height: 180px;
    border: solid black 2px;
    border-radius: 10px;
    padding: 5px;
    text-align: center;
    color: white;
    vertical-align: middle;
  }
  span {
    display: inline-block;
    vertical-align: middle;
  }
  div.msg {
    display: block;
    background: #6699CC;
    width: 180px;
    height: 50px;
    border: solid black 2px;
    border-radius: 10px;
    padding: 5px;
    text-align: center;
    color: white;
    margin: 1px;
    vertical-align: middle;
  }
  div#container {
    vertical-align: baseline;
    border: solid 1px white;
    padding: 5px;
    text-align: center;
  }
</style>
<script src="fwajax3.js"></script>
</head>
<body>
<div style="text-align:center"><h4>HTML5 Drag&Drop with pure AJAX file upload test.</h4></div>
<div id="container"><span id="panel">Drop image here.<br></span> <span><div class="msg" id="msg1"></div><div class="msg" id="msg2"></div><div class="msg" id="msg3"></div></span></div>
</body>
</html>
<script>
document.ondragenter = function(e){e.preventDefault();}
document.ondragover = function(e){e.preventDefault();}
document.getElementById('panel').addEventListener('dragenter', function(e){
  e.preventDefault();
  if(window.console) console.log('dragenter');
  e.effectAllowed = ['move'];
},false);
document.getElementById('panel').addEventListener('dragover', function(e){
  e.preventDefault();
  if(window.console) console.log('dragover');
  e.dataTransfer.dropEffect = 'move';
},false);
document.getElementById('panel').addEventListener('drop', function(e){
  e.preventDefault();
  e.dataTransfer.dropEffect = 'move';
  if(window.console) console.log('drop');
  if(window.console) console.log(e.dataTransfer);
  if(e.dataTransfer.types && e.dataTransfer.types.length>0) {
    for(var i=0; i<e.dataTransfer.types.length; i++) {
      if(window.console) console.log(e.dataTransfer.types[i]);
      if(e.dataTransfer.types[i]!=='Files') {
        if(window.console) console.log(e.dataTransfer.getData(e.dataTransfer.types[i]));
      }
    }
  }
  //can't get FileList in Chrome7... and Firefox4 didn't follow the FileAPI standard...
  if(e.dataTransfer.files.length>0) {
    for(var i=0; i<e.dataTransfer.files.length; i++) {
      switch(e.dataTransfer.files[i].type) {
        case 'image/jpeg':
        case 'image/gif':
        case 'image/png':
        case 'image/bmp':
          document.getElementById('msg1').innerHTML = 'File name: '+e.dataTransfer.files[i].name;
          document.getElementById('msg2').innerHTML = '';
          document.getElementById('msg3').innerHTML = '';
          setTimeout(function(blob){
            return function() {
              var fileReader = new FileReader();
              fileReader.onload = function() {
                if(window.console) console.log('got an image file.');
                //if(window.console) console.log(this.result);
                var uploader = new fwH5AjaxUploader(
                  'save_ajax.php',
                  function(_txt,_xml) {
                    if(window.console) console.log(_txt);
                    var msg = JSON.parse(_txt);
                    if(msg.state == 'success') {
                      document.getElementById('msg3').innerHTML = 'File uploaded: '+blob.name;
                      var img = document.createElement('img');
                      img.src = msg.path;
                      img.width = '110';
                      img.style = "text-align:center";
                      document.getElementById('panel').innerHTML = 'Drop Here.<p>';
                      document.getElementById('panel').appendChild(img);
                      img = null;
                    }
                  }
                );
                uploader.addFile(
                  'fileupload',
                  {'name':blob.name,'type':blob.type,'data':this.result.slice(this.result.indexOf(",")+1)},
                  'base64'
                );
                document.getElementById('msg2').innerHTML = 'Start uploading: '+blob.name;
                uploader.send();
              };
              try {
                fileReader.readAsDataURL(blob);
              } catch(e) {
                alert(e);
              }
            };
          }(e.dataTransfer.files[i]),100);
          break;
          default:
          alert('Only image file allowed.\nIncluding: jpeg, png, gif and bmp.');
          break;
      }
    }
  }
},false);
</script>
再來是負責上傳的Javascript程式,就是網頁中可以看到的fwajax3.js:
function fwH5AjaxUploader(host, cb) {
  var req = function() {
    try{ return new ActiveXObject("Msxml2.XMLHTTP.6.0") }catch(e){}
    try{ return new ActiveXObject("Msxml2.XMLHTTP.3.0") }catch(e){}
    try{ return new ActiveXObject("Msxml2.XMLHTTP") }catch(e){}
    try{ return new ActiveXObject("Microsoft.XMLHTTP") }catch(e){}
    try{ return new XMLHttpRequest();} catch(e){}
    return null;
  }(),
  boundary = function () {
    var tmp = Math.random();
    var thisDate = new Date();
    tmp = Math.abs(tmp*thisDate.getTime());
    tmp = "--------" + tmp + "--------";
    return tmp;
  }(),
//the format of _value argument should be {'name':'filename','type':'file mine type string', 'data':'file data in Data URL format'}
  createFile = function (_field, _value, _encoding) {
    var tmp = "--" + boundary + CRLF;
    tmp += "Content-Disposition: attachment; name=\"" + _field + "\"; filename=\"" + _value.name + "\"" + CRLF;
    tmp += "Content-Type: " + _value.type + CRLF;
    tmp += "Content-Transfer-Encoding: " + _encoding + CRLF + CRLF;
    tmp += _value.data + CRLF;
    tmp += "--" + boundary + "--" + CRLF + CRLF;
    return tmp;
  },
  createField = function (_field, _value) {
    var tmp = "--" + boundary + CRLF;
    tmp += "Content-Disposition: form-data; name=\"" + _field + "\"" + CRLF;
    tmp += "Content-Transfer-Encoding: binary" + CRLF + CRLF;
    tmp += _value + CRLF
    tmp += "--" + boundary + "--" + CRLF + CRLF;
    return tmp;
  },
  fields = [],
  files = [],
  CRLF = "\r\n";
  req.onreadystatechange = function() {
    if(req.readyState == 4) {
      if(req.status == 200) {
        cb(req.responseText, req.responseXML);
      }
    }
  };
  this.addFile = function(_field, _value, _encoding) {
    files.push([_field, _value, _encoding]);
  };
  this.removeFile = function(_field) {
    for (var i=0; i<files.length; i++) {
      if (files[i][0] == _field) {
        files.splice(i,1);
      }
    }
  };
  this.clearFile = function() {
    files = [];
  };
  this.addField = function(_field, _value) {
    fields.push([_field, _value]);
  };
  this.removeField = function(_field) {
    for (var i=0; i<fields.length; i++) {
      if (fields[i][0] == _field) {
        fields.splice(i,1);
      }
    }
  };
  this.clearField = function () {
    fields = [];
  };
  this.send = function() {
    req.open("POST", host, true);
    var msgBody = "";
    for (var i=0; i<fields.length; i++){
      msgBody += createField(fields[i][0], fields[i][1]);
    }
    for (var i=0; i<files.length; i++){
      msgBody += createFile(files[i][0], files[i][1], files[i][2]);
    }
    req.setRequestHeader("Content-Type","multipart/form-data; boundary="+boundary);
//    req.setRequestHeader("Connection","Keep-Alive");
//    req.setRequestHeader("Content-Length",msgBody.length);
    req.send(msgBody);
  };
}
後面幾個setRequestHeader因為在Chrome7會出現警告訊息而無法執行,所以乾脆拿掉。不過看起來拿掉也可以正確上傳檔案就是了(這是用我很久以前寫的東西改的,當時這樣改header是允許的)。
最後就是接收上傳資料的php程式:
<?php
$uploaddir = 'upload/';
$uploadfile = $uploaddir . $_FILES['fileupload']['name'];
header('Content-type: text/json');
if (move_uploaded_file($_FILES['fileupload']['tmp_name'], $uploadfile)) {
  $str = file_get_contents($uploadfile);
  $str = base64_decode($str);
  file_put_contents($uploadfile, $str);
  echo "{\"state\":\"success\",\"path\":\"$uploadfile\"}";
} else {
  echo "{\"state\":\"fail\",\"path\":null}";
}
?>
目前測試過,在Chrome7跟Firefox4上面都可以正常執行,只是...Firefox4不支援border-radius,所以圓角沒出來,看起來會比較醜。接下來看一下在Chrome7上面執行的畫面:
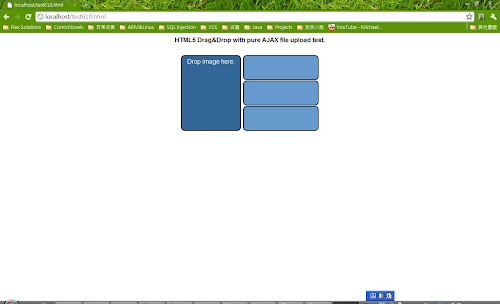 |
| 剛打開網頁的畫面 |
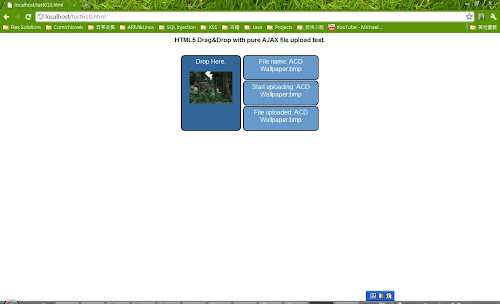 |
| 拖曳圖檔上傳完畢後的畫面 |
圖檔上傳完畢後,會自動建立一個img,src指向上傳的檔案的URL。由於檔案上傳會比較花時間,如果等不及而另外拖拉檔案上去的話,畫面可能會不一致,例如右方顯是的是最後拖拉檔案的資訊,但是左側的圖片顯示的是最後上傳完畢的圖片。另外,這些程式都只是做概念驗證,所以沒有考慮到安全...要試用的話請自己注意安全。還有,上傳檔案時,檔案會先讀進記憶體,而Javascript GC不是那麼頻繁的話,所以瀏覽器會吃掉不少記憶體。